Microsoft Teams
View:
Overview
Microsoft Teams offers an all-in-one collaboration and communication solution, integrating chat (IM), online meetings, calling, file management and a project work space.
Microsoft Teams and OneDrive will be the foundation to launch other applications in the Microsoft Office 365 suite in the near future.
Getting Started
Faculty and Staff
Faculty and staff who meet the service requirements will be able to access the tools at portal.office.com by signing in with their CWLs and going through the multi-factor authentication process. From there, they can use the web-based versions or download the applications.
Service Requirements
Microsoft Teams and OneDrive will be available to faculty and staff who meet the following criteria:
- An active employee status
- A firstname.lastname@ubc.ca email alias that is associated with their FASmail mailbox
- An active Enterprise Active Directory (EAD) account
- An active Faculty and Staff (FASmail) mailbox
Please review MS Teams Best Practices for guidance on adding external users and guests to a UBC Team.
Features and Benefits
Microsoft Teams will address the collaboration gaps for:
- Faculty
- Hosting office hours
- Hosting instructional sessions for learners
- Interaction with colleagues work and teaching assistants.
- Real-time document collaboration
- Staff
- Asynchronous collaboration with colleagues
- Real-time document collaboration
- Microsoft OneDrive will provide additional storage to enhance the collaboration process
Microsoft OneDrive
View:
Overview
Microsoft OneDrive is a file hosting and synchronization service operated by Microsoft, as part of their suite of Microsoft 365 applications. OneDrive allows users to securely store, share, and synchronize files and folders from anywhere at anytime.
Getting Started
Faculty and Staff
Faculty and staff who meet the service requirements will be able to access the tools at portal.office.com by signing in with their CWLs and going through the multi-factor authentication process. From there, they can use the web-based versions or download the applications.
Service Requirements
Microsoft Teams and OneDrive will be available to faculty and staff who meet the following criteria:
- A firstname.lastname@ubc.ca email alias that is associated with their FASmail mailbox
- An active Enterprise Active Directory (EAD) account
- An active Faculty and Staff (FASmail) mailbox
Features and Benefits
Microsoft OneDrive gives you:
- One terabyte (1TB) of secure data storage
- Access and share from all of your devices
- Easy co-authoring
- Seamless integration with Word, Excel, and PowerPoint
MS Teams, OneDrive — Training and FAQ
View:
Getting Started – Setting Up Your Team
Creating and Using Channels
Collaborating on Files in MS Teams
Instructor Led Teams Training
What is Instructor Led Teams Training?
We offer Instructor Led Training for our colleagues who would like additional assistance beyond the resources in this service catalog. Our instructor led training are virtual training sessions led by technicians on the Collaboration team. These sessions cover the basics of using Microsoft Teams and are intended for new users. The sessions are approximately 40 minutes, and include time for any specific questions you have regarding Teams.
What does Instructor Led Teams Training cover?
By the end of an Instructor Led Training session, you will be able to:
- Log into Microsoft Teams.
- Understand the difference between a Team and a Channel.
- Understand the difference between the Teams desktop and web clients.
- Navigate through the Teams client.
- Search for contacts, teams, and channels.
- Send chat messages and files.
- Book a Teams meeting from Microsoft Outlook.
- Join and participate in meetings.
You can sign up for an Instructor Led Team Training session by clicking on the link below and filling out the form:
https://ubc.ca1.qualtrics.com/jfe/form/SV_em5s6gziyKBETzg
For those who would prefer an asynchronous training session, a recording and the slides are available at the links below:
Microsoft OneDrive and Teams Best Practices
View:
Microsoft OneDrive
Microsoft OneDrive is a file hosting and synchronization service operated by Microsoft, as part of their suite of Microsoft 365 applications. OneDrive allows users to securely store, share, and synchronize files and folders from anywhere at any time.
Microsoft Teams
Microsoft Teams offers an all-in-one collaboration and communication solution, integrating chat (IM), online meetings, calling, file management and a project work space.
Creating a Team
It is recommended that a unit head, or manager be responsible for creating a Team.
Organizing your Team
Teams should be organized either by subject matter (e.g., committees), or by functional units (e.g., departments).
Best practices for organizing teams in Microsoft Teams
Channels
Channels may be projects within the team, subsets of the team (e.g., working groups), or subject-specific communications (e.g., special events). The General Channel is required, and its name cannot be changed. Channels are visible by everyone within the Team by default. Private Channels can be used by subset of the Team that don’t want information to be seen by everyone.
When to use a Channel
- When communications are ok to be seen by the entire team. (e.g., Announcements)
- When information is intended to be transparent.
- For scheduled and ad hoc Team Meetings.
- For files to be collaborated on by anyone on the Team.
Overview of teams and channels in Microsoft Teams
Chat
Use Chat to collaborate, meet, and share files with a small group of people. Avoid using chat to store finished files as they cannot be seen by other members not in the chat.
External and Guest Users
External Users
UBC Teams users can Chat and Meet with Skype for Business users from other organizations that are federated with UBC. External users cannot access posts or files in your Team Channels.
Call and chat with users from other organizations in Microsoft Teams
Guest Users
A Guest is someone using Microsoft Teams outside of your organization. Guests must be invited to join a Team by an Owner. Guests can Chat, Meet, and share files with the team. Please note, Channel posts and files can be accessed by Guests.
Best Practices when adding a Guest to your UBC Team
- Confirm with the guest which email they will be using to log into the UBC Team.
- Many staff and faculty have dual indentities (UNBC.ca, uVic.ca, VCH.ca, FHA.ca) and it is recommended you confirm which email they wish to use to log into a UBC Team as a guest.
- Shortly after adding the guest to a UBC Team, confirm that they have received the invite email to the correct address.
MS Teams Permissions
About and Accessing Team files
By default when a Team is created in Microsoft Teams a file repository is created automatically and shared with all Team members. In order to access the Team files, click the “Files” option at the top of the Team toolbar.

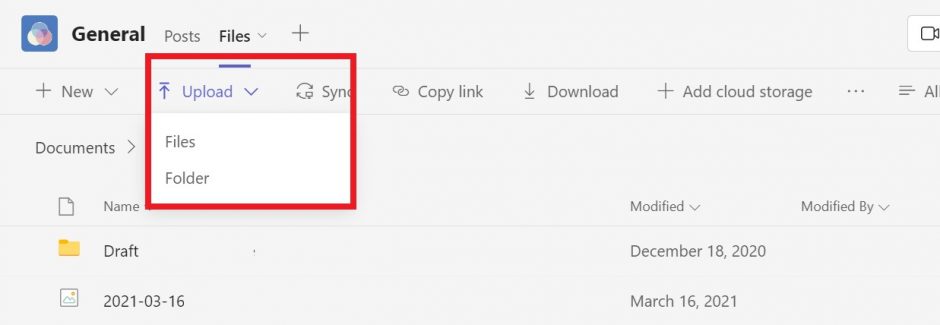
Uploading Files
Files can either be created directly in the Teams file area, or uploaded from your computer. Uploading files to a Teams site is very easy, just drag and drop the files from your computer into the Teams area or click the upload button.
Note, when you upload a file from your computer you create a copy of it so be sure to only maintain it in one place.
Editing/Viewing Files
Files can be edited or viewed directly in Teams. Simply click on the file name to open and edit
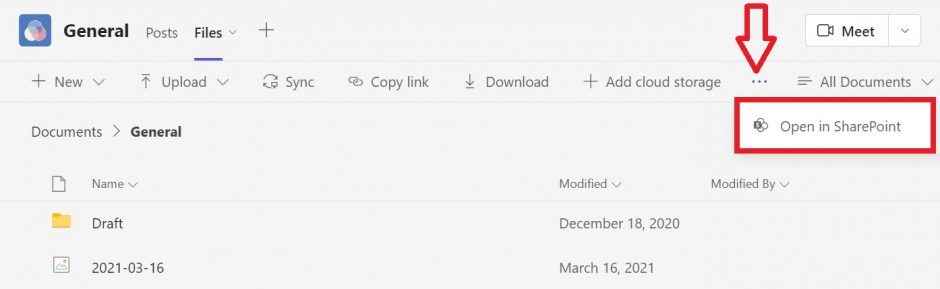
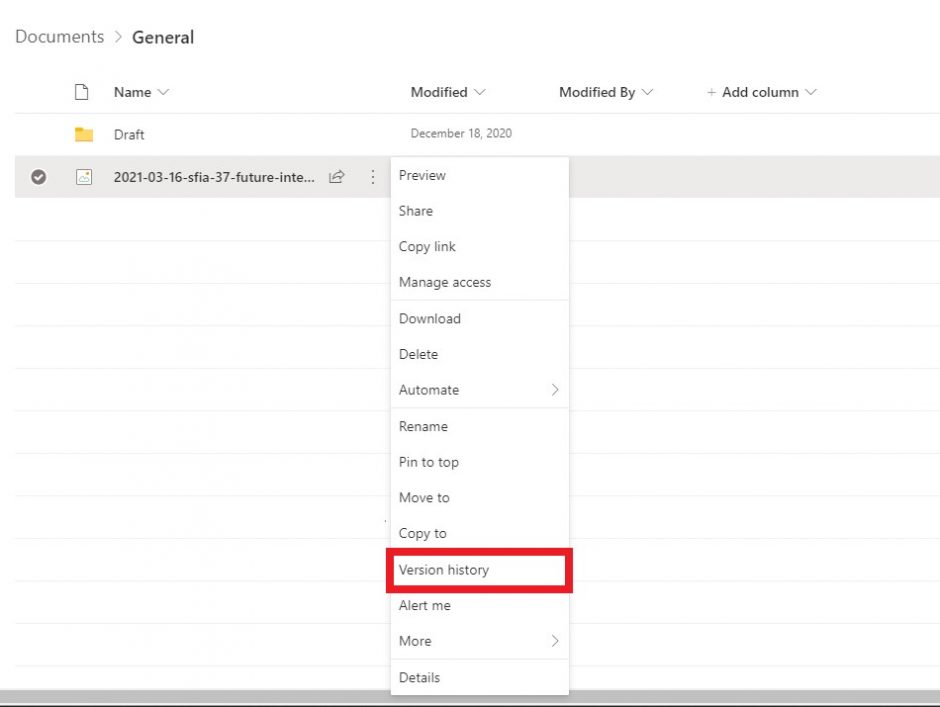
Managing Files
When Teams creates a file repository what it’s doing is creating a SharePoint site behind the scenes and sharing it with the team. As such, users can access advanced features such as managing permissions, syncing with OneDrive and version history by clicking the Open in SharePoint button:
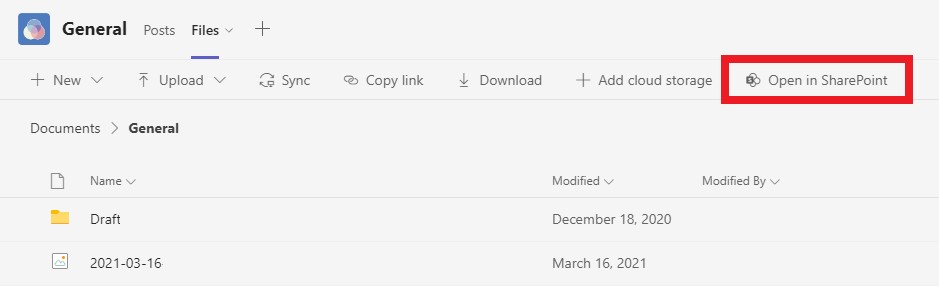
OR
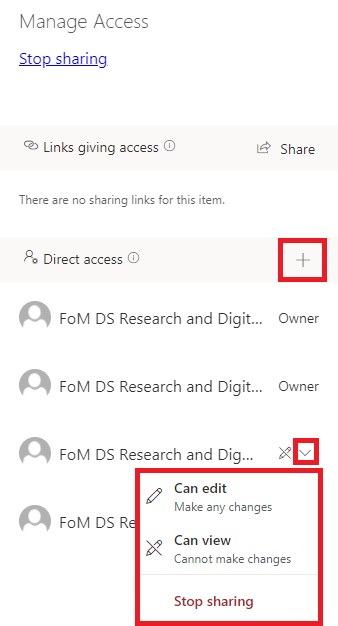
Manage Permissions
To manage permissions of a file or folder open the Files area in SharePoint.
Click the three vertical dots next to the file or folder name, and select manage access.
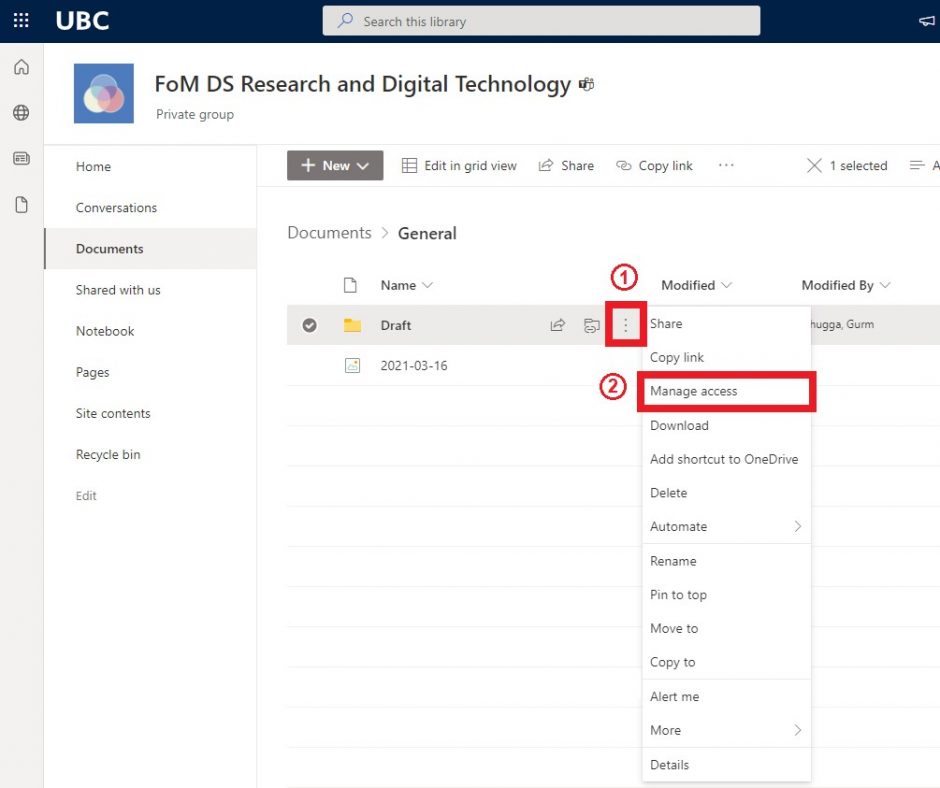
By default, members and team guests will have access to all files shared with the team however, this can be removed from the Manage Access option (note: Team owners must have access to all files) Additional users can be added with the plus option.
Sync
Syncing a SharePoint library allows you to access the Teams files through your desktop OneDrive client. This will allow you to use Teams files very similar to other folders and files on your computer (or the H: & S: drives and OneDrive) through explorer or Finder directly.
Click the sync button in Teams view to get started.

When prompted, select to open in OneDrive. OneDrive is the application that will operate on your device to keep track of file changes. When the process has completed, you’ll notice a “UBC” option on your Finder (Mac) or Explorer (PC) Click it and you’ll see all of your synced Teams files.
Version History
Zoom
View:
Overview
UBC has a campus-wide license for Zoom as a platform for delivering teaching and learning sessions and meetings online. Zoom is an easy-to-use video conferencing platform that offers a wide range of features. Different versions of Zoom are available:
UBC Zoom
UBC Zoom provides users with the flexibility to book and organize their own Zoom teaching and learning sessions and meetings. UBC Zoom is used for regular meetings and educational purposes only and is not intended to involve patients.
FoM Zoom
FoM Zoom integrates seamlessly with the Faculty of Medicine’s suite of videoconferencing services like FoM VC rooms and FoM recording. FoM Zoom is used for regular meetings and educational purposes only and is not intended to involve patients.
Zoom for Healthcare
Zoom for Healthcare is a license provided by Health Authorities and has been approved by the BC Ministry of Health for the delivery of virtual health. It is used for virtual patient appointments which may or may not include a students presence. To request for a license, please contact your Health Authority Virtual Health Team.
Compare FoM and UBC
Refer to our comparison chart to understand and compare the functions of UBC Zoom and Faculty of Medicine (FoM) Zoom types.
Getting Started
UBC Zoom is available to all UBC faculty and staff members. UBC Zoom accounts must correspond with a named email account (ex. first.lastname@ubc.ca) and cannot be provisioned for departmental or shared usage (ex. department.admin@ubc.ca). If you require a UBC Zoom account, please fill out the UBC Zoom Account Request Form.
FoM Zoom can be booked via RoomFinder. All videoconference bookings will include FoM Zoom.
If you need a virtual only session, book via RoomFinder by:
- Choosing ‘Yes’ for the ‘Is this a videoconference session?’ question.
- Then selecting ‘Yes’ to the ‘Is this session purely online with no physical rooms?‘ question.
NOTE: You can join a test meeting to test your connection and familiarize yourself with meeting controls before joining your session.
Requirements
UBC Zoom and FoM Zoom is available to all UBC faculty, staff members, and learners for meeting and collaboration purposes, as well as for distributing online teaching and learning sessions with 300 attendees (or more by request). For best results/experience it is recommended to use a headset, web camera, and a wired internet connection to your computer while in a Zoom session.
Features and Benefits
Zoom allows for video, audio, and screen sharing between participants. It can be used from any computer, laptop, tablet, or phone, and is compatible on PC, Mac, Android and iOS devices.
- Accessible on multiple devices – Attendees can participate in meetings using smartphone, computer, or audio only.
- Interactive and engaging – Collaborative whiteboard and annotation, and remote control of screen. Use live chat used to ask questions or provide visual feedback.
- Security compliant – Zoom meets FERPA/HIPAA compliance, and complies with UBC’s Information Security Standards.
- Accessibility for all learners – Ensures that everyone can participate equitably with closed captioning and keyboard shortcuts.
Support and Training
Training Options
Zoom Support: Got a quick question about Zoom? Need more Zoom training? Click here to explore the services provided by the Education Technology Team
Teaching with Zoom: Faculty Development provide training and support on teaching on the Zoom Platform.
Visit their website, or if you require individual support, email them at fac.dev@ubc.ca.
Zoom Online Tutorials: General training on the use of the tool.
- Zoom Help Center: General tutorials and FAQs
- Zoom Help Center: Video tutorials
- Zoom Help Center: Register for live training (or watch recorded training sessions)
- Meeting Host: Prior to your session review the FoM Moderate a Zoom Meeting Guide.
Privacy
See UBC’s statement on Zoom privacy and security.
Instructors should inform students that the Zoom servers are located outside Canada, and that they can maintain their privacy by logging in using only their first name or a nickname, turning off their camera, and muting their microphone.
Zoom Download Center
Software, including the Zoom application, updates and the Zoom Outlook plugin can be found on the Zoom Download Center.
For FoM managed computers please install using Software Center.
Updates must be installed by the user. For instructions on updating your client please see this tutorial.
Moderate a Zoom Meeting
Any Zoom meeting can have a Host and Co-Host(s). The Host and Co-Hosts have elevated privileges allowing them to better manage the participants and format of the meeting. Use this guide to learn how to manage your Zoom-hosted videoconference.
View:
Claim the Host Role
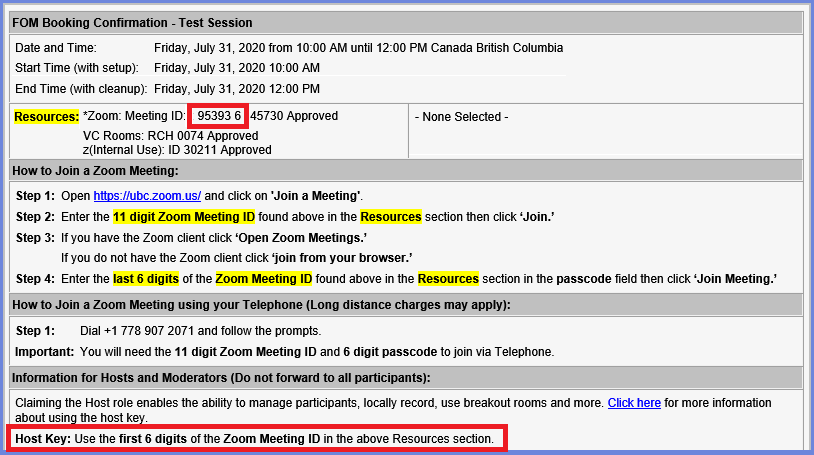
In order to claim the host role, you will require the 6-digit Host Key that is in the email confirmation the requester received when the Zoom meeting was booked.
This host key is unique to each meeting, please confirm on your confirmation.
Please Note: You cannot claim the host role if you are joined via web browser. You must download the Zoom desktop app. For instruction refer to the main Zoom page.
To claim the Host Role:
- Join your meeting.
- Click on the Participants button, in the meeting controls at the bottom.
- Click on the Claim Host button, in the participants pane on the right.
- Enter the Host Key. The host key is the first six digits of the Zoom Meeting ID.
- Click on Claim.
Host Controls
Find these and other controls at the bottom of the Zoom window when not sharing your screen:
| Control | Description |
|---|---|
| Security | Hosts and co-hosts can manage the security of their meeting using the following features:Lock MeetingEnable Waiting RoomRestrict participant sharing, chat, and screen name accessRemoving participants |
| Manage Participants | Invite or remove participants from the meeting. |
| Record | Starts/stops a local recording. After your meeting has concluded the recording file will be saved to your computer. Staff who are using Zoom for sensitive discussions should not use the Local Record feature. Local recordings using Zoom must be kept secure and confidential. |
| Closed Caption | Closed captioning, also known as auto-transcription, can be turned on after claiming the host role. |
| Breakout Rooms | Distribute participants into separate meeting rooms. Breakout rooms can be timed and everyone will return to the main room. Some features, like prescheduling breakout groups, are not available on FoM Zoom. If you require prescheduled breakout groups, please contact the MedIT Resource Coordination (medit.resourcecoordination@ubc.ca) team for options. |
| End | End the meeting for all participants or leave the meeting and assigning a new host. |
For more information on Host Controls, please refer to the Zoom Help Center.
Summary – MS Teams and MS OneDrive
| Primary Use | Great For… | Sharing and Access Control | Conversations and Communications | |
|---|---|---|---|---|
| | Team / Committee / Working Group | Project-oriented teams to have a conversation, work together in files, call, and meet right where the work is happening. | Teams can be public (open to anyone in your organization) or private (managed membership). | Communicate in real time with teammates in a chat-based environment and in online meetings. Use Private channels to restrict visibility of files and content to members of private channel only. See “Creating and Using Channels” video for more details. |
| | Individual / Team | Storing and syncing files in the cloud and accessing them from anywhere on any device. Ideal for work in progress and sharing with specific individuals. | Documents are private until you share them. Share files individually and work on Office documents with others at the same time. | Comment on documents and use the @-sign with someone’s name. The person you mention receives mail with a link to your comment. |
Slido
The Faculty of Medicine recommends Slido for polling and Q&A, and maintains an educational license for FoM teaching and learning, and administrative events. You can request a Slido via our intake form, and find more information on Slido on the Educational Technologies website.