Step-by-step instructions for booking Faculty of Medicine rooms and videoconferences.
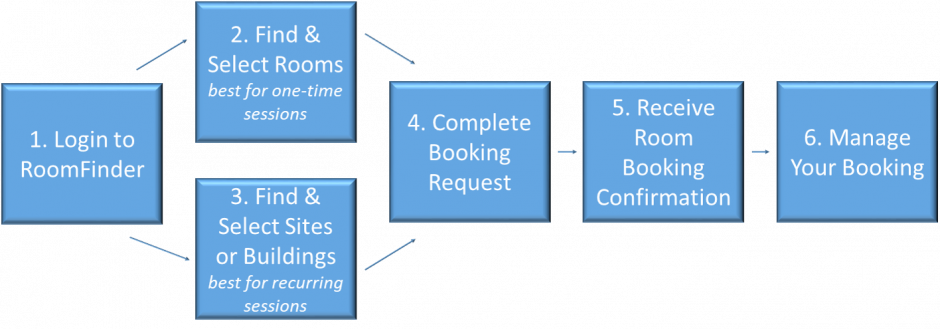
1. Login to RoomFinder
Using Chrome web browser, navigate to Room Finder (https://rooms.med.ubc.ca) and login with your UBC Campus Wide Login (CWL).
Don’t have a CWL?
Staff from partner institutions who frequently book Faculty of Medicine rooms can request a CWL using the Room Booking Access Request Form. Please allow five days for your account to be set-up.
2. Find & Select Rooms
Use this step to search Faculty of Medicine rooms to find ones that will meet your needs and to see which rooms are available for your session. Best for one-time sessions.
NOTE: If a room has a range listed for capacity, the lower number indicates how many seats have the UBC recommended minimum of 760mm (30″) of table space for the user. The larger number indicates the maximum capacity of the room, disregarding the minimum for table space. For example: The LSC 1001 Lecture Theatre has a range of 307-360, meaning 307 people can be seated in the room with at least 30″ of table space, or 360 people can be seated at total capacity.
Find Rooms
From the “View Rooms” tab, you can search for rooms using various criteria:
- Select videoconference or non-videoconference rooms
- Search for rooms that are available at the time of your event, by entering a time and hitting the “See Available Rooms” button
- Using the search bar, enter text (e.g., room or building name, room number)
Entering any of these criteria will narrow down the list of rooms that are displayed below.
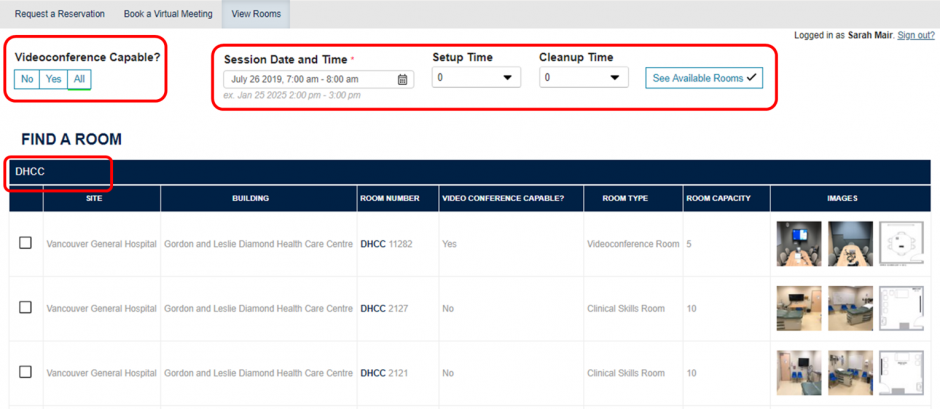
Select Rooms
Select the room that you’d like to reserve by using the check box to the left of the room information. Continue this process to add more rooms, if needed.
Deselect Rooms
To deselect a room, navigate to the room on the room list and remove the check-mark. (You can also remove rooms from the “Request a Reservation” page)
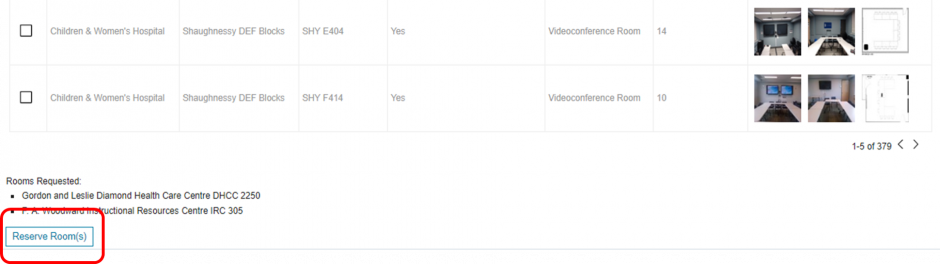
Complete your Request
Once you are ready to complete your request, click Reserve Room(s) which will take you to the Request a Reservation tab.
3. Find & Select Sites or Buildings
Use this step to request a booking at a particular site or building without identifying a specific room. Best for recurring sessions.
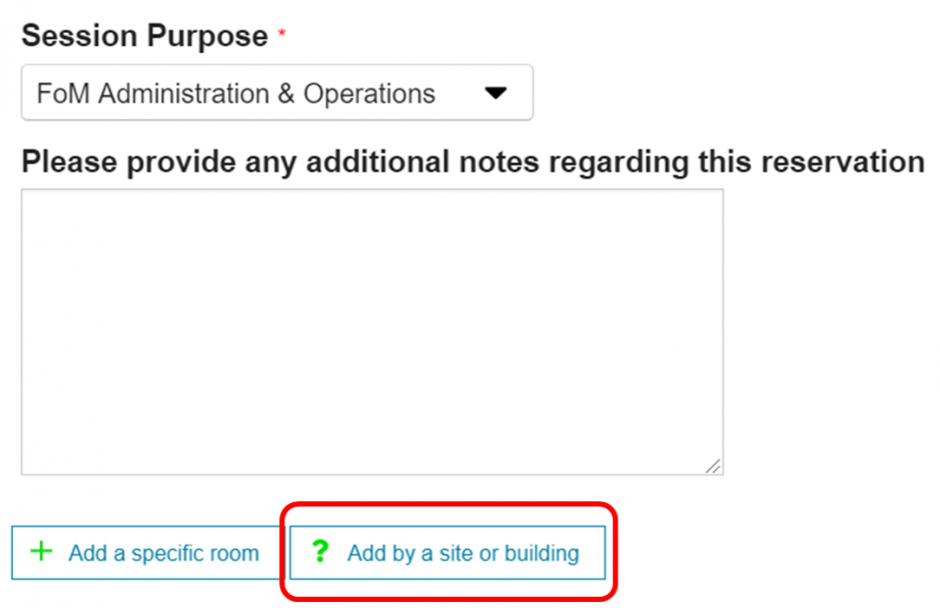
Search for a Site or Building
From the “Request Reservation” tab, scroll to the end of the reservation details, and click “Add a site or building”
A pop-up window will appear. The window lists frequently used sites and buildings. Click “show more” or use the search bar to see more sites and buildings.
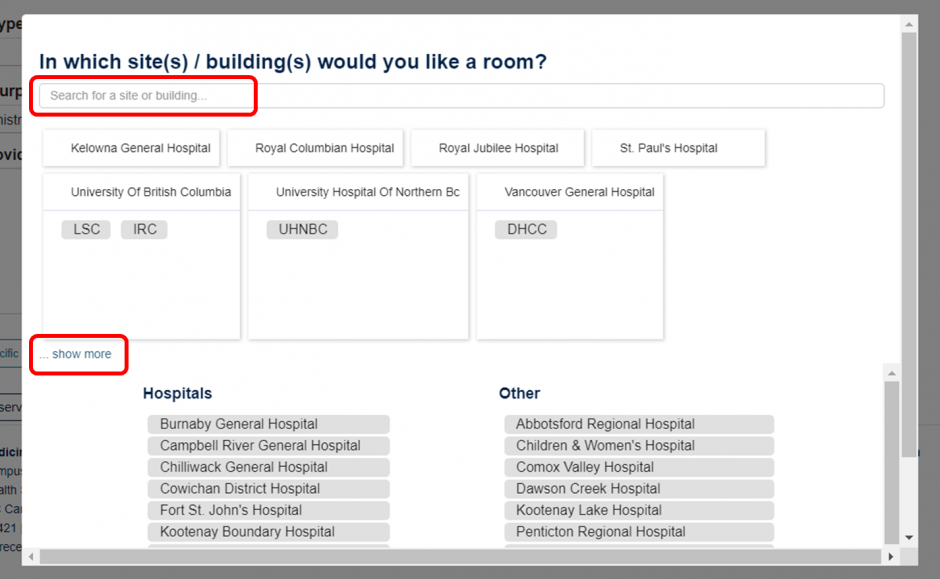
Select a Site or Building
Click on the site or building name that you want to add it to your request. Repeat the process to request a room at multiple sites or buildings.
Once you’ve selected the sites or buildings you’d like to request, scroll to the top of the Request a Reservation page to complete your reservation.
4. Complete Your Booking Request
The “Request a Reservation” page is where you enter information about your session that is needed in order to make a room booking. Note: RoomFinder remembers information from your last booking request and auto populates a number of fields on this page.
Enter Session Information
| Information Field | Description |
|---|---|
| Your Details: Email Address | Autopopulates the email address linked to your CWL. |
| Your Details: Phone Number | Enter your phone number and extension in any format. |
| Setup Time | Setup time is time before the start of the session for the setup of equipment, videoconferencing and furniture. If your session includes videoconference, the video will start during setup time.Note: Your session may have setup time added automatically if it is supported by a technician. |
| Cleanup Time | Cleanup time is time after the session used to clean up and do any other post-session activities, or provide a buffer between sessions. If your session includes videoconferece, the video will end before cleanup time. |
| Recurrence | Session recurrence can be set for daily, weekly and monthly events. Indicate in the “Notes” field at the end of the page if there are any exceptions in start/end times or rooms required on specific dates. |
| Videoconference Bridge | A videoconference bridge is equipment that connects videoconference calls. Most Faculty of Medicine videoconference sessions will use the UBC Collaboration Bridge. If you have arranged for a Health Authority or other institution to bridge the session (i.e., they will “call” the Faculty of Medicine rooms you have booked) please indicate that be selecting “Health Authority” or “Other” from the drop down. |
| Site name and room connection details for non-Faculty of Medicine rooms | See How to add a non-FoM room to a booking for information. |
| Do you need technical support? | See Help & Support for information about technical support options. |
| Do you want the session recorded? | See Event Recording for information. |
| Session is for | Indicate which organization/group the session is being arranged for. |
| Association Type | If you indicated that the session is for “UBC Faculty of Medicine,” you will see an additional drop down that asks for more information about the organizational unit that the session is for. Options:Administrative Support Units – examples: Faculty Affairs, Finance, DevelopmentDepartments & SchoolsResearch Centres & Institutes You will receive a secondary pop-up that asks for the organizational unit. If the session is for multiple units, choose one. |
| Session Type & Session purpose | Type: Refers to the kind of session that you are having (e.g., conference, exam, lecture, meeting)Purpose: Refers to the content or goal of the meeting (e.g., UG Year 1, Research, FoM Administration & Operations) Choose the Session Type & Purpose that best represents your session. |
| Additional notes | Additional information about your session can be entered here, including special requirements, changes to recurring sessions for specific dates, or any other information that will help the Resource Coordination Team complete your booking. |
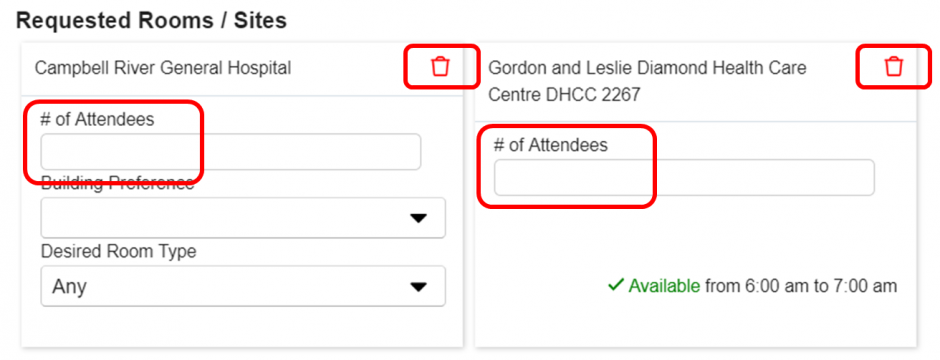
Confirm Requested Rooms/Sites & Enter Attendees
At the bottom of “Request a Reservation” you will see the rooms or sites/buildings you have selected. Enter the number of attendees at each location.
You can also add new rooms or sites/buildings by clicking “Add a room” or “Add a site/location.”
Remove Rooms or Sites/Buildings
To remove rooms or sites/buildings, click on the trash can icon next to the room or site/building name.
Submit your Request
Click “Request Reservation” to submit your booking request to the Resource Coordination Team.
5. Recieve Your Room Booking Confirmation
The Resource Coordination Team will review your booking request and respond in 1-2 business days with a confirmation or request for additional information. See the Sample Room Booking Confirmation to understand the information included in a confirmation.
Once you receive your room booking confirmation, please review it to ensure all details are correct and you are familiar with room access or know how to connect if joining by videoconference.
Note: for most one-time sessions, an automatic hold is placed on requested rooms while the Resource Coordination Team completes their review. In these cases, the room will show as being occupied in RoomFinder and Resource Scheduler.
6. Manage Your Booking
Change or cancel your booking
Please refer to our Room Booking FAQs for information on changing or cancelling your booking.
Make a session “private”
It is possible to make a session private so that the session name is not visible in Resource Scheduler. This is intended for sessions with sensitive subject matter or for the privacy of the participants. To make your event private, please indicate this in the notes section of your request, or contact fom.resourcecoordination@ubc.ca.
Transfer a session to another person
If the person who originally requested a session is no longer responsible for it (e.g., they leave their position), the session should be transferred to a new organizer. This ensures that the Resource Coordination Team knows who to contact in case of changes. To update the contact for a session, please email fom.resourcecoordination@ubc.ca.